Craft Your Perfect No-Bake Protein Bars: Healthy & Easy
In a world bustling with convenience, it's tempting to reach for a store-bought protein bar when hunger strikes or energy dips. However, have you ever stopped to consider the ingredients list or the dent these seemingly healthy snacks make in your wallet? Commercial protein bars often come with a hefty price tag—easily adding up to $30 or more for a small box—and can be surprisingly loaded with artificial sugars, preservatives, and unpronounceable ingredients. The good news? You can ditch the expense and the questionable additives by crafting your own delicious, nutritious, and incredibly easy no bake protein bars right in your kitchen.
Imagine biting into a fresh, wholesome bar that’s perfectly tailored to your taste and dietary needs, knowing exactly what went into it. These homemade nutritious no-bake protein bars are not only a boon for your health but also a serious win for your budget and precious time. Say goodbye to complicated recipes; we're talking about a handful of simple, natural ingredients that come together in minutes to create a powerful, satisfying snack.
Why Choose Homemade No-Bake Protein Bars?
The appeal of making your own no bake protein bars extends far beyond just saving money, though that's certainly a compelling factor. Here's why embracing the DIY approach is a game-changer for your health and lifestyle:
- Unmatched Ingredient Control: This is arguably the biggest advantage. When you make your own, you dictate every single ingredient. This means no artificial sweeteners, unhealthy fats, unnecessary fillers, or chemical preservatives. You choose pure, whole foods that nourish your body, giving you peace of mind with every bite.
- Significant Cost Savings: Compare the price of a few simple pantry staples to a box of premium store-bought bars. The difference is staggering. Homemade versions are dramatically more affordable, allowing you to enjoy a steady supply of healthy snacks without breaking the bank. This makes them an excellent option for budget-friendly no-bake protein bars.
- Tailored to Your Taste & Dietary Needs: Allergic to nuts? No problem. Prefer a specific type of protein or sweetener? You're in charge. Homemade bars can be customized to suit any palate, allergy, or dietary preference, whether you're gluten-free, dairy-free, vegan, or simply have a favorite flavor profile.
- Incredible Convenience & Versatility: These bars are the ultimate grab-and-go snack. Perfect for busy mornings, a post-workout refuel, an afternoon pick-me-up, or even a healthier dessert option. Making a batch ahead of time means you always have a healthy choice at your fingertips, preventing less healthy impulse buys.
- Superior Freshness & Flavor: There’s no comparison to the taste of freshly made food. Homemade no bake protein bars boast a freshness and depth of flavor that packaged versions simply can't match.
The Power of Pure Ingredients: Crafting Your Base
The magic behind these simple, healthy protein bars lies in just a few core ingredients. Each plays a crucial role in delivering nutrition, flavor, and that perfect bar texture. The beauty is their simplicity and natural origin:
- Whole Rolled Oats: Ditch the quick or instant oats here. Whole rolled oats provide a more robust texture, excellent fiber content, and complex carbohydrates for sustained energy release. They are the backbone of your bars, offering a satisfying chewiness and helping to bind the mixture.
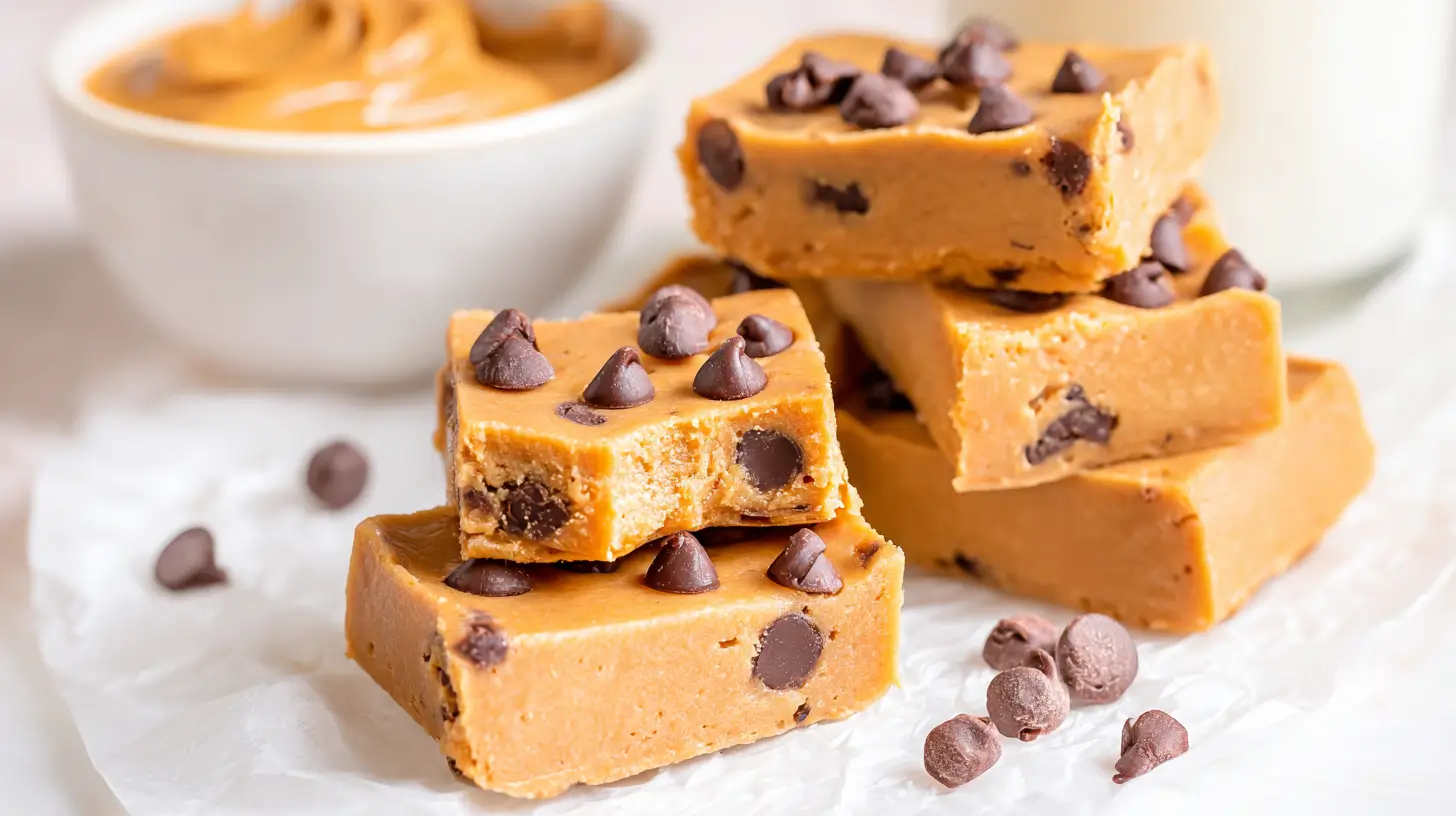
- Nut Butter (or Seed Butter): This is your primary binder and a fantastic source of healthy fats and additional protein. Real peanut butter, especially a chunky variety, adds delightful texture and classic flavor. For those with nut allergies or seeking variety, alternatives like almond butter, cashew butter, or sunflower seed butter work beautifully, offering slightly different flavor notes and nutritional profiles. Always opt for natural versions with minimal added sugars or oils.
- Whey Protein Powder: The star of the show for that protein punch. We highly recommend choosing a pure, unflavored 100% whey protein powder. This gives you the most control over flavor and avoids the often unpalatable aftertaste associated with artificial sweeteners found in many flavored powders. However, if you prefer, a high-quality vanilla or chocolate whey protein can add an extra layer of flavor without needing additional extracts. For plant-based alternatives, pea protein or a blended vegan protein powder can also work, though you might need to adjust the liquid slightly as they can absorb differently.
- Natural Sweetener & Binder: Real maple syrup or honey are your go-to choices. They serve a dual purpose: providing natural sweetness and, critically, acting as a sticky agent to bind all the ingredients together. Their natural stickiness ensures your bars hold their shape without crumbling. Agave nectar is another viable option if you prefer.
- Liquid Base (Milk of Choice): A small amount of liquid helps achieve the right consistency. Regular whole milk is a classic choice, but feel free to use any milk that suits your diet: almond milk, oat milk, soy milk, or even a light coconut milk. The type of milk can subtly influence the final flavor and richness of your no bake protein bars.
Whipping Up Your Bars: A Simple Step-by-Step Guide
The process of making these no bake protein bars is incredibly straightforward, requiring minimal equipment and culinary skill. You’ll be amazed at how quickly you can create a batch of these wholesome treats.
- Melt and Combine Wet Ingredients: In a medium saucepan, combine your chosen milk, nut butter, and natural sweetener (maple syrup or honey) over low heat. Stir continuously for a few minutes, just until the ingredients are well combined and warmed through into a smooth, cohesive mixture. The goal isn't to boil, but to create a viscous, unified base.
- Incorporate Dry Ingredients: Remove the pan from the heat. Now, add your protein powder, whole rolled oats, and any initial add-ins like a pinch of cinnamon or a dash of vanilla extract. Stir vigorously until all the dry ingredients are thoroughly coated and integrated into the wet mixture. The mixture should be thick and somewhat sticky.
- Taste and Adjust: This is a crucial step! Take a small spoonful and taste. If you desire more sweetness, now is the time to add a little extra maple syrup or honey. If the mixture seems too dry, a tiny splash more milk can help, but be conservative. If it's too wet, a tablespoon of extra oats can firm it up.
- Press and Chill: Line an 8x8 inch (or similar sized) baking pan with parchment paper, leaving an overhang on the sides for easy removal. Transfer the mixture to the prepared pan. Using the back of a spoon, your hands, or another piece of parchment paper, press the mixture down firmly and evenly across the entire pan. The firmer you press, the more compact and less crumbly your bars will be. Aim for your desired bar thickness.
- Cool and Cut: Allow the pressed mixture to cool completely at room temperature, then transfer the pan to the refrigerator for at least 1-2 hours to firm up. Once chilled and solid, use the parchment paper overhangs to lift the slab out of the pan. Place it on a cutting board and slice into individual squares or rectangles.
Smart Storage & Creative Customization
Once you’ve mastered the basic recipe for your no bake protein bars, the real fun begins with storage and endless customization options. These bars are incredibly versatile and can be adapted to suit any craving or occasion.
Storage Solutions:
- Room Temperature: If stored in an airtight container, these bars can last 3-4 days at a moderate room temperature, perfect for quick access.
- Refrigerator: For extended freshness, keep them in an airtight container or individually wrapped baggies in the fridge for up to 1 week. Chilling also enhances their firmness and chewiness.
- Freezer: For longer-term storage (up to 2-3 months), wrap individual bars tightly in plastic wrap or parchment paper, then place them in a freezer-safe bag or container. They thaw quickly at room temperature or can be enjoyed slightly frozen for a refreshing treat.
Pro Tip: For ultimate convenience, individually wrap each bar before chilling or freezing. This makes them perfectly portioned and ready to grab for your gym bag, backpack, or lunch sack.
Creative Add-Ins:
Beyond the core ingredients, a myriad of add-ins can transform your simple bars into gourmet delights:
- Sweet Touches: White chocolate chips, dark chocolate chips, mini semi-sweet chips, carob chips. For a neater on-the-go bar, skip the drizzled chocolate and incorporate chips directly into the mixture.
- Dried Fruits: Dried blueberries, cherries, cranberries, diced apricots, or even finely chopped dates for extra sweetness and chewiness.
- Nuts & Seeds: Roasted chopped almonds, walnuts, pecans, pistachios, pumpkin seeds, chia seeds, flax seeds, or hemp hearts. These add healthy fats, fiber, and an extra crunch.
- Coconut: Shredded toasted coconut offers a lovely texture and tropical flavor.
- Spices: A pinch of cinnamon, nutmeg, or even a tiny amount of cardamom can elevate the flavor profile. A sprinkle of sea salt can also surprisingly enhance the sweetness and balance the flavors.
- Extracts: A few drops of vanilla extract, almond extract, or peppermint extract for a burst of unique flavor.
Consider flavor combinations like "Chocolate Peanut Butter Swirl" (add mini chocolate chips and a little extra peanut butter swirled on top before chilling), "Berry Blast" (dried cranberries and blueberries with vanilla protein), or "Tropical Coconut Crunch" (shredded toasted coconut and macadamia nuts).
Fueling Your Life: The Lasting Benefits
Embracing homemade no bake protein bars is more than just a culinary experiment; it's a lifestyle upgrade. You're not just making a snack; you're investing in your health, your energy levels, and your wallet. These versatile, protein-packed powerhouses offer a convenient solution for anyone seeking a healthy, satisfying option for breakfast on the go, a post-workout recovery aid, or a wholesome pick-me-up snack throughout the day.
By taking control of your ingredients and effortlessly whipping up a batch of these delicious bars, you'll feel better, save money, and never be caught off guard by hunger again. So, gather your ingredients, unleash your creativity, and start crafting your perfect batch of homemade no bake protein bars today. Your body and your taste buds will thank you!
